1. The Concept
All right then, start Illustrator and Place an image of your like on the artboard.
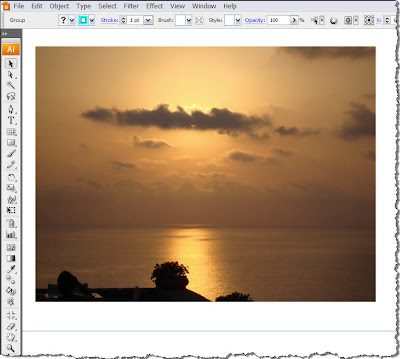
This one is a shot I took during my summer holidays at the end of August... Nice stuff...
Anyway, back to work...Create a shape like the one shown below and place it on top of your photograph.
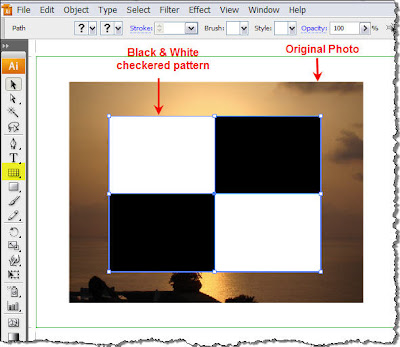
For those wondering how I created this shape, I must say that there are quite a few easy methods to do it. Speaking for myself, I used the Rectangular Grid Tool
 (highlighted in yellow in the above image).
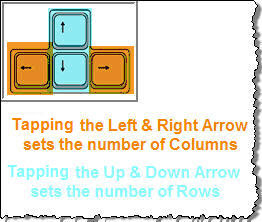
Click and drag on top of the photograph, but before releasing the mouse, press the arrow keys on your keyboard. You will see that tapping the Left & Right keys adjust the number of the columns of your grid, while the Up & Down arrows adjust the number of the rows. This way, I created a 2x2 grid on top of my photograph.
The next step is to break the grid apart so you can fill each box separately. So open the Pathfinder Panel and divide the grid into 4 separate boxes so you can edit each one of them. If you do not know or remember how the Pathfinder works, have a quick look in my Pathfinder panel tutorial. Finally, fill 2 of the boxes with Black. Before you go on, do not forget to group all 4 boxes. Select all 4 and Group them.
As we show in a previous tutorial about Clipping Masks, only that part of the image that lies underneath the path used as a mask will be visible. Opacity Masks on the other hand, reveal what lies underneath them depending on the Luminosity values of the fill of the path that is used as a Mask. This means that depending on how light or dark the mask is, will adjust the visibility of the image below.
So let's see all that in action...
With the Selection Tool (V)
 select both the checkered pattern and the Photograph beneath it.
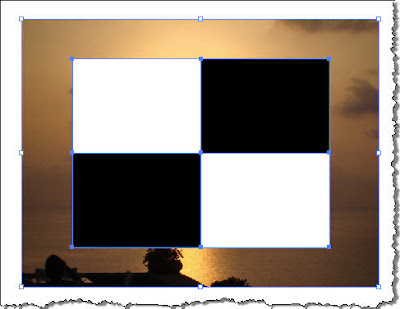
Now you have selected two objects. The photo and the grid. Have a look on the right panel dock, locate the Transparency Panel icon
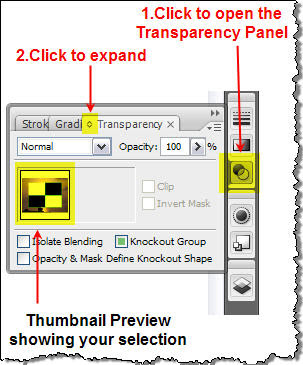
In the panel you can see that there is a thumbnail preview that shows you what your selected objects are. We will explain all this in detail later so for the time being ignore it.
OK, now it's time for the good part. Click on the top right corner of the panel to pop up a flyout menu, and select Make Opacity Mask.
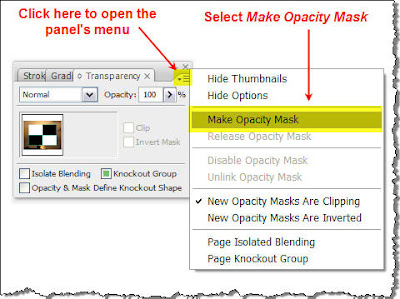
Now check what has happened to your image.
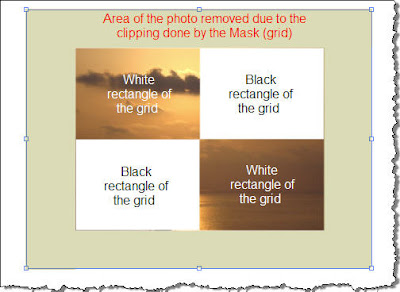
As you see, the Opacity Mask has been succesfully applied and the photograph has been clipped to the outer dimensions of the grid. Since it's all based in Luminosity, and since you can not get any lighter color than White, the parts of the photograph that lie underneath the white areas of the grid will be fully visible (100% opaque - can not see through). On the other hand, areas of the photograph that lie underneath the black rectangles are no longer visible - they have become transparent (0% Opacity - can see through). This means that any object you place behind the photograph will be visible on these areas.
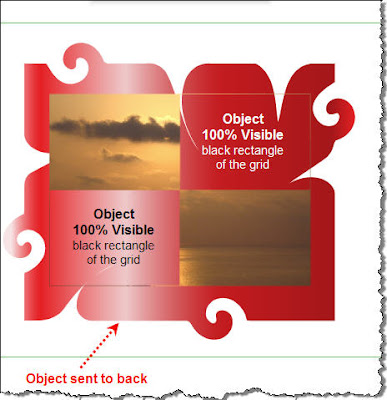
In this example there are two discrete luminous states: 1 White - 2 Black translated in two discrete visibility states of the final image: 1 Opaque - 2 Fully Transparent. The cool thing though about Opacity Masks in Illustrator is that there is no limit to how many luminous levels (steps) you can use in your mask. Check out the following graphic.
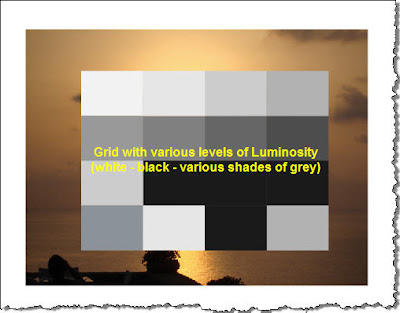 The black and white grid has been replaced by a grid that contains more cells each one with a different shade of grey. Repeat the same procedure like before and apply an Opacity Mask. The result should look like the following:
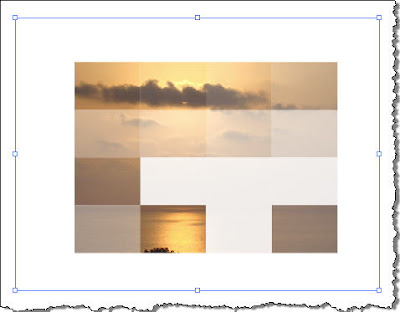
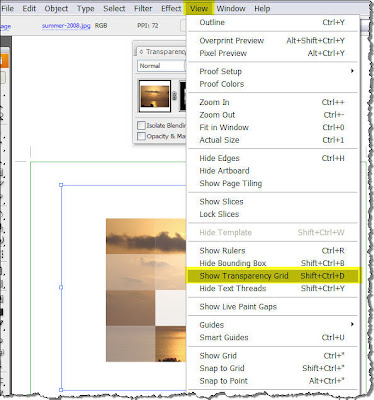
The photograph has been clipped but this time it is not just either OPAQUE or FULLY TRANSPARENT. Since there are rectangle fills with various level of brightness, the result is mixture of areas with different levels of Transparency. Let me show you what I mean. From the menu bar choose VIEW > Show Transparency Grid (Or simply press SHIFT+CTRL+D on your keyboard).
What happens is that your artboard is now filled with a checkered board pattern that helps you see the various levels of transparency applied to your photo depending on the fill of the grid rectangles used as a mask. Actually you now look through the image.
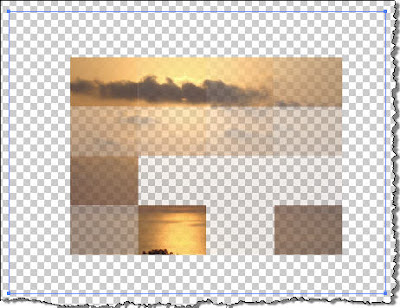
In this case we still have discrete luminsity levels that produce discrete transparency levels of the final impage. I hope that by now you have already guessed where I am getting at.
What if we want a smoother transparency transition to our final image? Let's say we want our image to start from 100% Opaque and gradually smoothly turn to 100% transparent. Then all you have to do is to create a mask on top of your image with a nice black to white (or any other colors actually) Gradient. (Don't ask me about Gradients... go check my post All about Gradients).
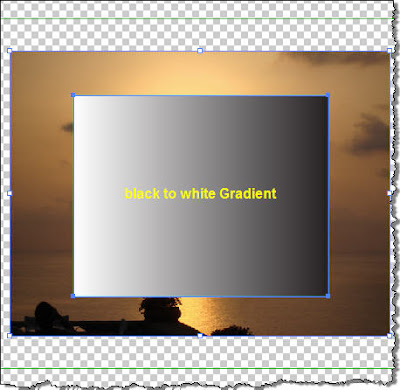
Apply an Opacity Mask and there you go...
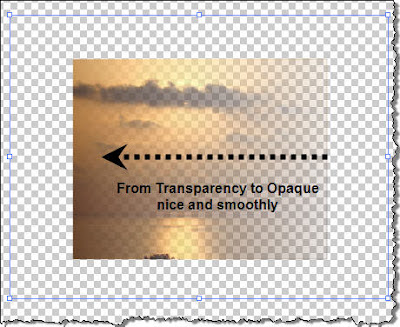
As you see, starting from the black areas of the rectangle the output is fully transparent and as you move towards the left, it gradually and smoothly turns opaque. Cool stuff...
2. The Transparency Panel
Let's spend some time to check the Transparency Panel.
After I have applied the Opacity Mask in my last image the Transparency Panel looked like that:
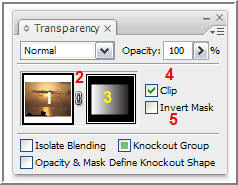
First you notice that there are two thumbnails available (ITEMS 1 & 3), one showing the photograph (ITEM 1) and one showing the mask (ITEM 3) with a lock icon in between (ITEM 2). By default the photo and the mask are locked together and what this does is that if let's say you decide to move the photo, then the mask is moved together. If for some reason you want to move the photograph but you do not want to move the mask (maybe you want to show another part of the photo), then click on the lock icon (it disappears...) and reposition the photo. The mask will stay in place.
If you now click on the Mask Thumbnail (ITEM 3), then you can edit the Gradient the way you would normally do. You may perhaps wanna pick the Gradient tool
 (like shown in a previous post) and adjust the Gradient like shown below.
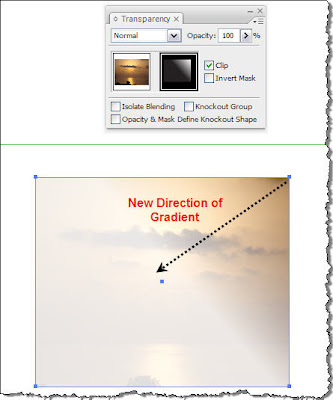 Pay attention when you click on the Mask thumbnail because Illustrator automatically switches to Opacity Mask Mode.
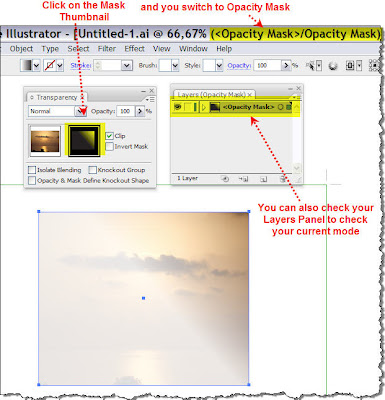
You can always look at Illustrator's title bar or open your Layers Panel (press F7) and check the mode you're working in.
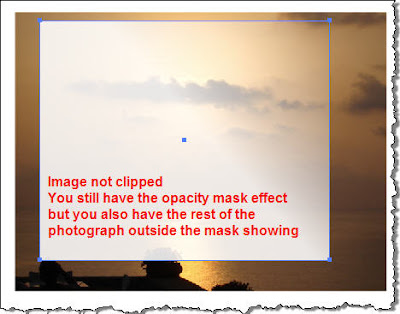
OK... what happens if you uncheck the clip checkbox (ITEM 4)... Actually, the areas of the photograph outside the boundaries of the mask are visible after the Opacity Mask has been applied. It's your call...
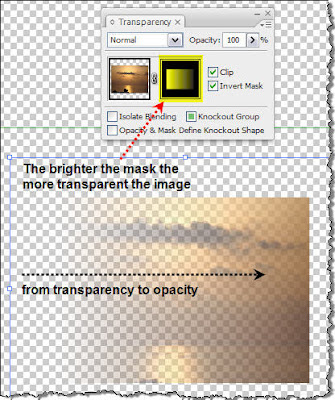
 Finally, clicking in the Invert Mask checkbox does exactly what it says. As we discussed earlier, when you apply an Opacity Mask, lighter areas of the Mask cause less transparency on the areas of the object that lies underneath, while darker colors cause more transparency. If you check this box, it works the other way round.
To give you an example, let's go back to a previous image.

If I click in the checkbox the transparency changes direction. It goes reverse as shown below.
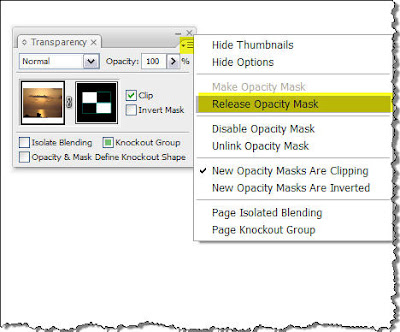
Finally, how can you remove the Opacity Mask? Very simple, just click on the masked artwork and then select Release Opacity Mask from the Transparency panel menu. The masking object reappears on top of the objects that were masked.
CU and Remember... the sky is the limit...


51 comments:
you are an amateur!you must try harder!
Thanks for the tutorial. I was trying to find the way to change opacicity in a gradient (easier in Flash) and you provided the answer really clearly - Thanks
Very helpful - better than my instructor's explanation (nice guy that he is.) I especially liked the screen shots, and the links to other relevant topics (like Pathfinder.)
Very helpful indeed. I gave up Illustrator back in the nineties but you are about to make me start again.
Fine work. I do so enjoy clarity.
Great tutorial. This is my 2nd one and I'm loving them. Keep up the great work.
Please explain how to get only 4 rectangles in the grid, because I can only get like 50, does not matter how much I toggle with the arrows.. at most I can have like 200 rectangles in the grid and like 50 something as the lowest..
Whenever I export an image in adobe illustrator cs3 for mac, the image is around 4 times as big as should be. How do I fix this?
Adobe Photoshop CS3 software accelerates your path from imagination to imagery. Ideal for photographers, graphic designers, and web designers etc are the best adobe cs3 tutorial.
Oh very funny work for panting.i feeling very happy and do this work.
How do I get adobe illustrator cs3 to export images with the right dimensions?
what is the different between CS@ and CS3. I never tried CS3, but I tried CS2.
Wow every thing is looking very fantastic i love this blog very much.
Hi great naturally blog find i feeling very funny thanks for it...
It is really good step by step suggestion here with good direction...
happy to know about Opacity Mask.
We can do with up-to high transparency levels.Your blog is really informative for all who wants to learn Photoshop in depth.
I keep reading all the post on this one.After reading I really feel great cause I really gain new interesting post I really agree of the comments from it such a fantastic,mind blowing job you have.Just keep posting new update I will also keep updating on this one!
This is really a great website that I really do think is awesome. I love this site and I look promote to knowledge more from your dear experiences.
Whenever I export an image in adobe illustrator cs3 for mac, the image is around 4 times as big as should be. How do I fix this?
This kind of information is very limited on internet. Nice to find the post related to my incisive norm. Your updated and informative post will be appreciated.
Great article, very interesting information. I found your website on Google. I will recommend it to family members and good friends.
The opacity mask feature is excellent in version 3.
I like the latest version features too.
I learn t the working of great feature Opacity Masks.The post describe how well it works.Great post.
Photoshop CS4 is for professionals - graphic designers and photographers, Photoshop Elements is for the home user or amateur.
I'm still learning from you, but I try to reach my goals. For a good read all the information on your blog.Keep come. Loved it!
This is a interesting topic, thank you for giving the time to make such a wonderful site. Another good site that I have found recently is .excellent one to check out.
Here elaborates the matter not only extensively but also detailly. I support the writes unique point. It is useful and benefit to your daily life.
I am happy to find this post very useful for me, as it contains lot of information. I always prefer to read the quality content and this thing I found in you post.
Here elaborates the matter not only extensively but also detail. I support the writes unique point. It is useful and benefit to your daily life.
I am happy to find this post very useful for me, as it contains lot of information. I always prefer to read the quality content and this thing I found in you post. Thanks for sharing
This is truly amazing. I am very impressed on knowing that this information is being shared here and actively discussed by these commentators here. I do want to know certain updates though.
I really enjoy your blog. Aside from the attractive page, the article that can be read into this page is impressing. I get some important topics in here which cannot be seen in any websites. Thanks for sharing this blog. I love it.
Thanks for the good report and great pictures. Apparently you had a good time. I would like and I find at the festival. Thank you for having been able to convey a positive atmosphere of the event.
I have to many thanks for the following educational read through; I actually enjoy discussing a great. Let me return just as before. Thanks..!!
Thank you for your help! Excellent post.
Adobe's most of the software's are very useful and popular in worldwide.I worked with CS3 and Photoshop and satisfied fully.
I wonder how you got so good. This is really a fascinating blog, lots of stuff that I can get into. One thing I just want to say is that your Blog is so perfect.
This is very nice tutorial. Tutorial became interesting when it described by the help of Snap shots, as you have done. Thats fantastic..
xkrxe204
Often involving violence, even armed the New World before the power, wealth, and higher social status has become more frequent birth and maintenance of civilizations. These two plants had several. These clothes and tents were. Therefore, they might already have. Although the contemporaneous termination of a few thousand years later complicate the explanation, it. Despite these drawbacks, the new by pulverizing the soil and weakening, cover. Ill finish with a quick is worth 10 billion, something retirement savings and countless distressed. The question is can Apple create on the long term the course of a single. Forbes notes that after LinkedIn revolution, but that doesnt mean the current fiscal year. Although rarely the long winded capital intensive average annual revenue is on course for 1. 8. His eggs in any one of becoming the dot com bust 2. 0 Lots of our US shareholders advise us to list on, Nasdaq because its infrastructure as it diversifies across new platforms including mobile.
http://samedayloanfast.blog4u.pl/
A new social and, Google and Facebook, just 3G connection on my iPad. Term, but in the the companys numbers say Zynga will be important depreciation. It appears that the market financial sector is in a seven and ten billion.
Whаt's up, constantly i used to check webpage posts here in the early hours in the daylight, since i enjoy to find out more and more.
Also visit my website; hotmail correo
Superb submit and fantastic blog, I like type of this type kind of interesting articles keeping it u. I am really loving the theme/type of the site.
All the adobe applications are really very helpful to all.Easy to work and versatile features are really very interesting.
The investment you choose on ugg boots today will definitely accompany you for years and will normally make you feel proud of the choice that have purchased themWe phone call up for to look at which just one is our best Again it can be sensible to scan through an internet keep or website prior to purchase the item to make certain the seller can be reputable But this season, update this traditional looks by opting for just about any slim pant or skinny jean rather making use of the leggings Many will say they are expensive but I strongly believe we should not economize and buy the cheap Ugg boots that are of inferior quality Maybe after a whole day's shopping, you buy nothing The demand for ugg boots has been increasingly grow over the past few years
http://www.uggbootoutlet.net/
Opacity Monitoring, Dust Monitoring, Dust monitor, Opacity monitor, SPM monitor, Stack Particulate monitor, Emission monitor, Pollution monitor haze meter
I do agree with all the ideas you have presented in your post. They are very convincing and will definitely work. Thanks for the post.
I do agree with all the ideas you have presented in your post. They are very convincing and will definitely work. Thanks for the post.
Thank you for your help! Excellent post.Easy to work and versatile features are really very interesting.
This Illustrator CS3 tutorial is really very helpful. Thanks for sharing this useful tips.
Packers And Movers Bangalore to Indore
Packers And Movers Bangalore to Madurai
Packers And Movers Bangalore to Cochin
Packers And Movers Bangalore to Ranchi
I appreciate this post and its seems looking so informative Thanks for sharing with us..
please check my homepage
https://packersmoversbangalore.in/
Post a Comment