In previous versions of Photoshop, whenever you opened more than one photos, then each one opened in a separate free floating window. For example, have a look at the following picture... I opened 3 photographs with Photoshop CS3 and each one has its own window.

As you can see, with only just 3 photos open on our screen, things begin to become a bit messy and counter productive... One in front of the other, and in general if we open some more files then it is clear that things will soon get out of control.
OK, let's see now how Photoshop CS4 deals with this quite annoying issue.
If I open the same three photographs with CS4 what I get is the following.

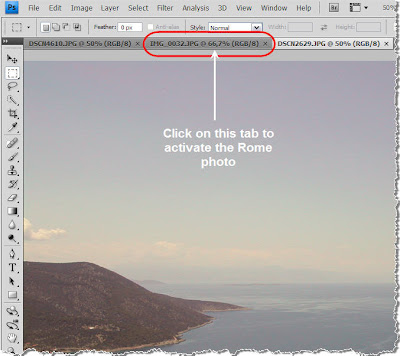
We have only one main document window and each photo is open and arranged in a tabbed layout. Click on a tab to view the photograph you want.

This is what happens...

Try clicking between the tabs and switch from one photo to the other. Or even better, - and faster - hold down CTRL and press the TAB key (Ctrl+TAB). With this shortcut you toggle from one document to the other in a snap!
OK, click on the middle photo now to activate it. In this case it's the photo I shot in Rome.

You can change the order of the tabs by simply clicking and dragging the tab you like wherever you like.

If you do not like this tabbed interface do not worry at all. Just click on a photo's tab, drag away from the docking area and release somewhere nearby.

The result is to have this file in the familiar free floating layout as seen below...

If you now change your mind and you want to put the photo back in the stack, just reverse the procedure. Click on the photo tab and drag somewhere near the tabs title area and release. You will also notice that when you approach the area you can let go, the file automatically snaps into place.
Suppose now you want to undock the rest of the photos. Instead of repeating this procedure for every single file, there is a quicker way to do that. At the top menu select: Window > Arrange > Float All in Windows.

The result is as follows:

Similarly, you can revert to the previous tab-style state by selecting Window > Arrange > Consolidate All to Tabs.

You now switch back to one window mode and multiple tabs.

Let's see now how we close a tabbed document. Quite easy... If you take a closer look at the document title, there is a little x sign towards the right. Click it and the document goes away...

If you do not like this tabbed layout of your documents then you can easily go and disable this feature. How? Simply choose Edit > Preferences > Interface... from the top menu.

In the pop-up window uncheck the tick box "Open Documents as Tabs".

If you do that, you will no longer have your documents opened in a tabbed layout but instead you will have the classic free floating windows.

