I will grab the opportunity from my last post regarding multiple strokes and fills, and I will explain in detail the Stroke Panel and its functions. You use the Stroke panel to control whether a line is solid or dashed, the dash sequence if it is dashed, the stroke weight, the stroke alignment, the miter limit, and the styles of line joins and line caps. So let's see all that in detail.
Start Illustrator and have a look on the right dock. Locate the Stroke Panel, click to open it and expand it by clicking on the small two-sided arrow symbol, so we can see the rest of the settings available.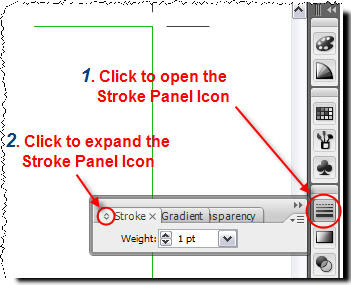
Small Tip:
Alternatively go to Top Menu, Window > Stroke.
Now you should be able to see the fully expanded Stroke Panel. For demonstration reasons I've divided the panel in 5 areas. So, let's see what each section does.
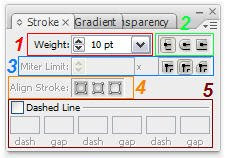
1. Adjust the width of the stroke.
Quite straight forward. Select your path, just enter a value in the box (or just click the arrows) and you adjust the thickness of the stroke.
So start Illustrator, create a new document and draw a straight path using the pen tool  (or any other tool you prefer) so that we can experiment with. Try creating something like that.
 (or any other tool you prefer) so that we can experiment with. Try creating something like that.
 The larger the value, the thicker the stroke.
Note
Please keep in mind that in all the above cases, the path looks the same . If you select View > Outline (or just click CTRL+Y) from the Menu bar, you shall see that in all four cases the path is identical.

Ok, let's return to Preview Mode and move forward. Select View > Preview (or just click CTRL+Y) from the Menu bar.
2. Change the cap style of a line.
A cap is the end of an open line. You can change the caps of a line by changing the object’s stroke attributes. In the following image you may see the different result of each selection.
 The Round Cap creates stroked lines with semicircular ends.
 The Projecting Cap creates stroked lines with squared ends that extend half the line width beyond the end of the line. This option makes the weight of the line extend equally in all directions around the line.
 3. Change the joins of a line.
A join is where a straight line changes direction (turns a corner). You can change the joins of a line by changing the object’s stroke attributes.
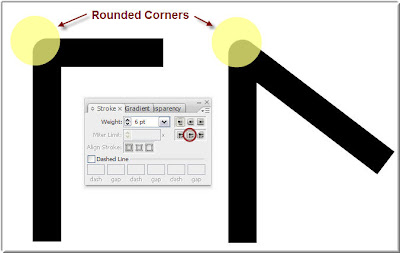
 The Round Join creates stroked lines with rounded corners. Have a look below:
 The Bevel Join creates stroked lines with squared corners. Have a look below:
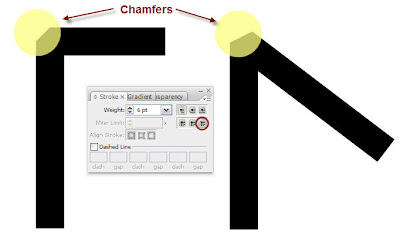
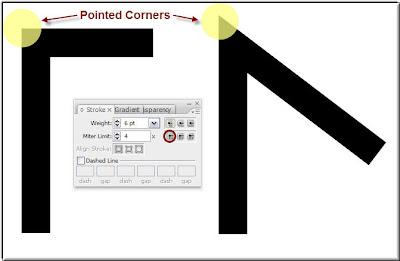
Let me explain to you now what is the Miter Limit. You can consider the Miter limit as a threshold above which a pointy 'sharp' corner is transformed to a bevel. How is this threshold defined? Have a look at the following illustration. There is a 6pt stroked line and I have set the Miter Limit to 5. This means 5 times the line thickness (6 X 5 = 30 pts). So If the Mitter Length - 'the corner head' (the overlapping common area of the two segments that form the corner) - is more than 5 times the stroke thickness of the path, then the corner will be beveled.
Here is an example.
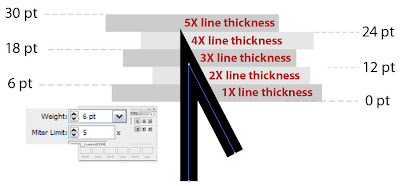 On the above image, you see that the arrow head length barely exceeds 24pts, this is a bit more than 4 times the line thickness. Since the limit is 5 and we stay below, the sharp Miter Join is maintained.
Ok, now I have reduced the Miter Limit to 4 times the line thickness of the segment. See what has happened. My nice sharp and pointy corner has been replaced by a chamfer. The limit has been violated, therefore the Miter Join is now replaced replaced by a Bevel Join.
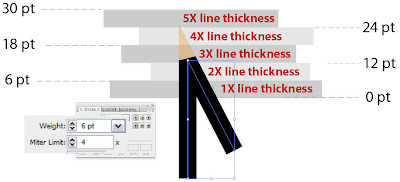
The Miter Limit controls when the program switches from a mitered (pointed) join to a beveled (squared-off) join.
4. Align the stroke along the path.
This option is only available in closed paths. So, let's draw a rectangle as shown below so that we explore all three options.
a. Align Stroke To Center
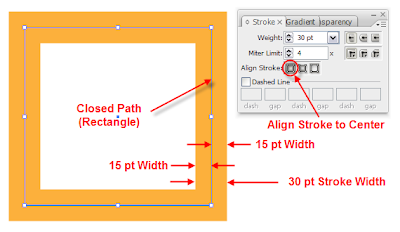 As you see, the stroke is symmetrically aligned to the center of the path.
b. Align Stroke To Inside
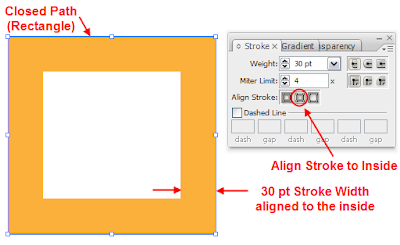 In this case, the stroke is aligned to the inside of the path.
c. Align Stroke to Outside
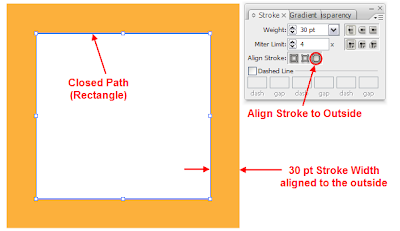 Here, the 30 pt amber stoke is aligned along the path to the outside area.
Note:
Be cautious when you try to align objects, to use the same stroke alignment settings, otherwise you will not be able to achieve perfect match and alignment.
5. Create a dotted or dashed line.
This is a handy tool that helps you quickly draw dotted lines or dashed lines. Let me show you how.
Draw a straight path segment so we can experiment with.
 Select the line and in the Stroke panel, check the Dashed Line checkbox. You can specify a dash sequence by entering the lengths of dashes and the gaps between them. I have used a sequence consisting of 5pt dashes and 20pt gaps. So just input these values in the first two boxes as shown below.
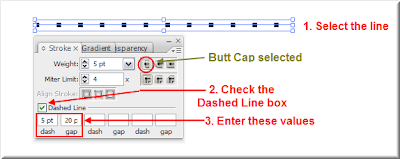
The numbers entered are repeated in sequence so that once you have established the pattern, you don’t need to fill in all the text boxes. The square-ended dashes result from the Butt Cap setting being selected. Select the line and toggle between the Butt Cap, the Round Cap and the Projecting Cap line ends and see what happens.

As you would have probably guessed, the Round Cap  option creates rounded dashes or dots and the Projecting Cap
  option extends the ends of dashes.
 option creates rounded dashes or dots and the Projecting Cap
  option extends the ends of dashes.
Try playing around with the values in the dash size and gap size and produce really nice patterns. For example if you input the values shown in the following image, you will end up with a nice dotted line.

Finally, you can create completely custom line patterns by filling all the values. For example, have a look at the following image. If you enter the values shown you will get the following nice interesting line pattern.
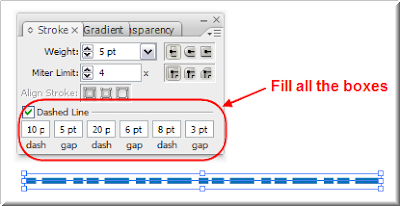
That's all folks...


55 comments:
Your explanation about the stroke pane is very detailed!! I have a question thou... Is it possible to control where my dash line begins on my stroke? Sometimes in my layouts I need the dashes to accurately begin at a certain point or be symmetrical! Please advise, thx!
If I have correctly understood the question posed, then I must say that I am not aware of an 'easy' way of doing what you say. One possible way though of achieving a symmetrical pattern of dashes (with exact positioning included) would be to create multiple strokes to your single path (of known dimensions), alternating each stroke's color (let's say black & white), testing various sequences of dashes and gaps, and playing with gap and dash sizes until you reach the desired result.
Maybe some other forum viewer could enlighten us both in this subject.
I am trying to understand open and closed paths.
For example, I have created hand-lettered words in Flash (because it has what to me is a realistic "brush" stroke that Illustrator seems to lack) and saved as .ai format. When I open the file in AI and try to add strokes to the paths, some of the letters will allow me to align the strokes and others will not.
After a lot of trial and error and experimentation, I found that I could select some of the letters (objects?) and apply a "Join"; this would then allow me to specify where to align the stroke. But just as often, I would not be allowed to Join... I'd get the dialog box about open paths, etc.
The letters (objects) were all created at the same time in Flash; exported together, and the new file opened -- so why are some of them "open paths" and some not?
Some (like A, B, etc) are compound paths, but the "ordinary" paths seem to often be "open" as well.
Is there a simple way to tell if a path is open?
What am I overlooking?
For the project I am working on, I much prefer Flash's tools - particularly the brushes -- but it's RGB.
I have to use Illustrator, to convert to CMYK... and the conversion process is frustrating and erratic.
I hoped that there would more compatibility between Flash and AI by now.
It'd sure be nice to be able to copy a drawing in Flash and be able to paste it into Illustrator without getting erratic corruptions...
Nelson hi...
As soon as I received your comment I tried doing exactly what you described. I created hand-written text in Macromedia Flash 8 by using the Brush tool, and then exported it as an .ai file. After I opened the image in Illustrator CS3 and after ungrouping the letters of the word, I was able to apply multiple strokes to each letter, use the align stroke option as i would normally do and in general i did not meet any open paths causing me trouble.
Things were different though when I tried to do the same thing by using (in Flash) the Pen tool, the Line tool and the Pencil tool. Then I realised that I could not align the stroke on any of these objects not until I expanded each one of them. After expanding, it's normal procedure.
In general, whatever I drew in Flash with the Brush Tool did not give me any trouble later in Illustrator.
So my suggestion is that you should use the Brush tool for creating your text in Flash, otherwise you will have to do tedious things in order for things to work in Illustrator.
Let me know how you finally dealt with this...
I went back and opened an AI file that I had created in Flash - using only the brush tool.
Once in AI, I selected the letters I had drawn and applied one-point strokes to them.
The effect I want is hand-lettered words (fills) with outlines (strokes) of a contrasting color.
AI seems to default to aligning strokes to the center of the path - and this causes half the width of the stroke to cover the fill.
What I need is to be able to adjust the stroke alignment to "outside"... but I can't find a way to make this happen consistently.
Sometimes there will be one letter in a word that can be adjusted in the way I want. This happens whether I select individual letters or the complete word.
I experimented with "Expanding" (something I've not used before) but was only to see a result when a letter had a stroke applied to it; the stroke would "expand" and become a separate object, but I could see no change to the fill.
Trying to Expand a fill without a stroke didn't seem to have any result; no options box, nothing.
Unfortunately, Flash doesn't seem to have a similar "align stroke" function, or I could use that...
I can get close to the effect I want in AI if I make a copy of my letter(s), paste them behind the original, and apply a wide stroke.
But this is time-consuming and frustrating - especially if I need to change a letter...
I've been experimenting... and I THINK I have been able to occasionally select a path (using the subselection tool) in Flash; copy it to the clipboard; and paste it into AI.
I think this has worked a few times... but other times, the resulting object (in AI) is badly distorted, appearing to consist of all straight line segments - no curves.
Even saving a Flash-created file in AI format seems to work inconsistently; when I examine the drawing in AI, it appears that the conversion process has added numerous anchor points.
Anyway -- enough of my complaining...
I appreciate your help!
P.S.
I started using Illustrator many years ago -- Illustrator 88 - but I find it too "technical" for much of my artwork (I do mostly cartoons and animation). When I discovered Flash, I was delighted: a vector based application that I could use to achieve much the same effects as using actual brush and ink on paper!
I've tried other applications, but Flash (despite some frustrating habits) works best for my purposes.
However - since it works only in RGB, I've had to try and adapt it to AI.
The results have been disappointing: the problem with strokes; the apparent added anchor points; and the extreme color variations when converting to CMYK.
I'd be willing to use AI to create my art - and avoid the conversion problems - but unless I've overlooked something,there's no "brush" in AI that works like the one in Flash.
If I could draw a brush stroke in AI that allowed me to vary thickness several times... then close it on itself (a circle, for instance)... then apply a fill of a different color... (sigh).
I keep wondering if I've overlooked or forgotten such an AI tool...
Any suggestions?
Thanks
I am trying to change the color of the stroke that I have used. I used red because I traced over a silhouette that was a dark color. Now I am getting rid of the image I traced and want the lines to be black. I have tried selecting lines and then simply changing the red color to black but the black color just goes underneath the red stroke (so the it looks like two strokes are layered on top of each other, but the strokes are not separate). If I try to delete the red stroke, the entire stroke gets deleted. Why is this happening?!
Choose the Export option under File in Illustrator, select Photoshop (or others) in the drop down menu, an option menu will come up, choose maximum editability (and the other options that suit your final use).
Good job on the tut,
Can I ask, is there a way of applying different stroke styles for different parts of the same line?
For instance I'm making a diagram of a path along a sphere, I want to make the path on the visible surface filled, and the path on the other side dashed.
Cheers
niklz
A vector image is an image made using a mathematical algorithm to lay out each point, allowing it to be fully scalable without losing quality. If you were to attempt to stretch a raster (pixel based) image, it would be choppy, fuzzy and unclear. But a vector image will stretch cleanly.
Click once to start the shape, it will make a point in your shape. Move the mouse to where the outside curve will be, and click again but hold down the mouse button and drag a bit to make a curve instead of a point. Make another point at the other end of the crescent.
I made a design on Adobe Illustrator and tried to export it but it said it was insufficient and not enough memory. So I erased like all of my pictures to where I'm saving it to and it still says it. What's wrong?
I tried to simply open the Illustrator file with fireworks, but some things are not showing up the same sizes as they were in illustrator cs3.
You can't preserve Illustrator layers going into photoshop. I'm unfamiliar with Fireworks, but I suspect that is true for it as well.
thanks for sharing this article, I've learn a lot of things dealing CS3 photoshop.
Stroke panel is essential for uniqueness.I admire those writers who share the best of their knowledge in writing such articles. Keep up the good work and continue inspiring readers.Thank you so much.
thanks to sharing this great article, i have learn more about that.
Even saving a Flash-created file in AI format seems to work inconsistently; when I examine the drawing in AI, it appears that the conversion process has added numerous anchor points.
Mhouse is a Luxury hotel in agra,India. We offer with special discount for guest at Cheap Hotel in Agra,Budget Hotel in Agra.
I am pretty glad to find this site. I would like to say thanks regarding this brilliant reading. If you possible could add Delicious button to your web page, it will benefit you to reach far more individuals over the internet. Cheers
What are some good Adobe Illustrator CS3 Tutorials?
Are there any good Illustrator CS3 tot's LIKE the "You suck at photo shop" Photo shop tutorials on you tube. I found those very helpful, but I cannot seem to find an equivalent for Illustrator.
Great article.It’ great that you are helping to spread the awareness. I think every child should be given an apple in the morning except other food. Really would help the child trough the day.
the image editing is very easy with latest adobe version and has few new features added.
If I could draw a brush stroke in AI that allowed me to vary thickness several times... then close it on itself (a circle, for instance)... then apply a fill of a different color... (sigh).
I keep wondering if I've overlooked or forgotten such an AI tool...
If I could draw a brush stroke in AI that allowed me to vary thickness several times... then close it on itself (a circle, for instance)... then apply a fill of a different color... (sigh).
I keep wondering if I've overlooked or forgotten such an AI tool...
I don't get it, this program is for professionals that needs to GET THEIR WORK DONE not look at pictures in fancy ways.
The site looks wonderful. This is my third occasion coming across this site. I will save it this occasion so that I don’t lose it over and over again. Keep up the hard work.
Adobe Illustrator and tried to export it but it said it was insufficient and not enough memory. So I erased like all of my pictures to where I'm saving it to and it still says it.
This is a very informative article.I was looking for these things and here I found it this information is very useful me.
Great! Generally I never read whole articles but the way you wrote this information is simply great and this kept my interest in reading and I enjoyed it. You have got great writing skills.
Well I am quite sure that it would not be new for you but your blog s fantastic! I am sure that many guys would have told you before but I thought to let you know myself and boost your confidence.
Nice CS3 tutorial. I admire those writers who share the best of their knowledge in writing such articles. Keep up the good work and continue inspiring readers.
I enjoyed working with Flash and Dreamweaver.Adobe Illustrator and tried to export it but it said it was insufficient and not enough memory.
You have done the great job.hey your blog design is very nice, clean and fresh and with updated content, make people feel peace and I always like browsing your site.
There are lot of information about the designing and CSS3. Thanks for that.
во скок каментов [url=http://profvesti.ru/o-stroitelstve-iz-penoblokov/]капитальный ремонт многоквартирного дома[/url]
[url=http://buyviagrapremiumpharmacy.com/#mykfk]generic viagra[/url] - buy viagra , http://buyviagrapremiumpharmacy.com/#drpdz buy viagra online
[url=http://buycialispremiumpharmacy.com/#kaaqu]buy cialis[/url] - buy cialis , http://buycialispremiumpharmacy.com/#ifvai generic cialis
[url=http://viagraboutiqueone.com/#qicxk]viagra online[/url] - viagra 150 mg , http://viagraboutiqueone.com/#bqrcl order viagra
[url=http://buyonlineaccutanenow.com/#ovizn]accutane without prescription[/url] - cheap accutane , http://buyonlineaccutanenow.com/#qqqbm accutane without prescription
Highly descriptive article, I loved that bit. Will there be a part 2?
Take a look at my site healthy diet plans
I’m not that much of a online reader to be honest but
your sites really nice, keep it up! I'll go ahead and bookmark your website to come back later on. Many thanks
Here is my site; Candy Crush Saga Hack
Why users still use to read news papers when in this technological
globe everything is existing on web?
Feel free to surf to my homepage :: Psn Code Generator
please post a tutorial about gradient panel in Illustrator.
thanks for the post.
adobe reader download
Great informational resource indeed!I am pretty sure that lot of your followers especially the graphic designers will get benefit from it.
Thanks!
very informative and helpful tutorial. unique clipping path give this service professionally
This WordPress module is made for shippers who need to offer items from their 3dcart Online Store inside their WordPress blog .
Wordpress Online Shop And Plugins Store
This is a most important blog and it’s very helpful for us. Thanks for sharing.
Oh my god. Great story of Sarah & Juan and the story is very interesting and lovely.
Be it corporate Send Gifts to India or bulk gifting, employee rewards or customer loyalty or any other gifting quest.
Send flowers to Delhi to show your special one that you care about a lot. Flowers are the best choice when it comes to gifting. Gifts N Roses is currently everyone's favorite online Gift portal which provides flower delivery in Delhi. In order to send flowers to Delhi or across Delhi. So, send lilies, roses or mixed flowers to Delhi from Gifts N Roses to convey your feelings to your friends and family members living in the capital city.
send Flowers to Delhi
Packers and Movers Kharghar - Shifting is one in the most stressful jobs in everyone’s life. Are you seeking for packers and movers in Kharghar for relocate your stressful task like house shifting, car transportation, office relocation and many others tasks. Then you are the right place. We Shir Shyam Packers and Movers have a team of well trained staff. As well as experienced employees of packing and moving industry. There are numbers of professional packers and movers in Kharghar. You could also invite their representatives for home inspection to get more exact afford relocation. But we Packers and movers Kharghar take pride in offering great packing & moving services at inexpensive price. All of our team are well experienced courteous and careful. You can expect personalized service for almost any kind of relocation requirement whether it is local interstate and intercity. Relocation could possibly be a terribly wearisome method also it makes individuals irritable.
Packers and Movers Vashi | Packers and Movers in Thane | Packers and Movers Bandra
Get Packers and Movers Kolkata List of Top Reliable, 100% Affordable, Verified and Secured Service Provider. Get Free ###Packers and Movers Kolkata Price Quotation instantly and Save Cost and Time. ✔✔✔Packers and Movers Kolkata Reviews and Compare Charges for household Shifting, Home/Office Relocation, ***Car Transportation, Pet Relocation, Bike SHifting @ Packers and Movers Kolkata
Packers And Movers Tollygunge kolkata
Packers And Movers Dumdum Road Bankura
Loved your blog, thankyou for sharing this article!!
cyber security companies
Top VCISO Provider
information security consultants
information security audit
security penetration testing consultants
Post a Comment